Инструкция
100% Disk Usage in Windows 11: 9 Fixes That Actually Work
Updated September 11, 2026
Short version: a Windows 11 disk sitting at 100% usage is a symptom, not a normal state. The usual causes are background services (SysMain, Windows Search, DiagTrack telemetry), too little RAM combined with heavy pagefile activity, outdated SATA/AHCI drivers, and malware. The nine steps below are the ones that reliably bring usage down — work through them in order.
Before you disable anything, open Task Manager (Ctrl+Shift+Esc), sort processes by the Disk column and note which process is generating the load. If a single process is the culprit, you can often skip most of the list below.
Contents
- What causes 100% disk usage
- Update your storage drivers
- Disable Windows Search
- Disable SysMain (formerly SuperFetch)
- Turn off page preloading in Chrome
- Add more RAM
- Turn off telemetry (DiagTrack)
- Reconfigure the pagefile
- Enable the High performance power plan
- Disable scheduled defrag on SSDs
What causes 100% disk usage
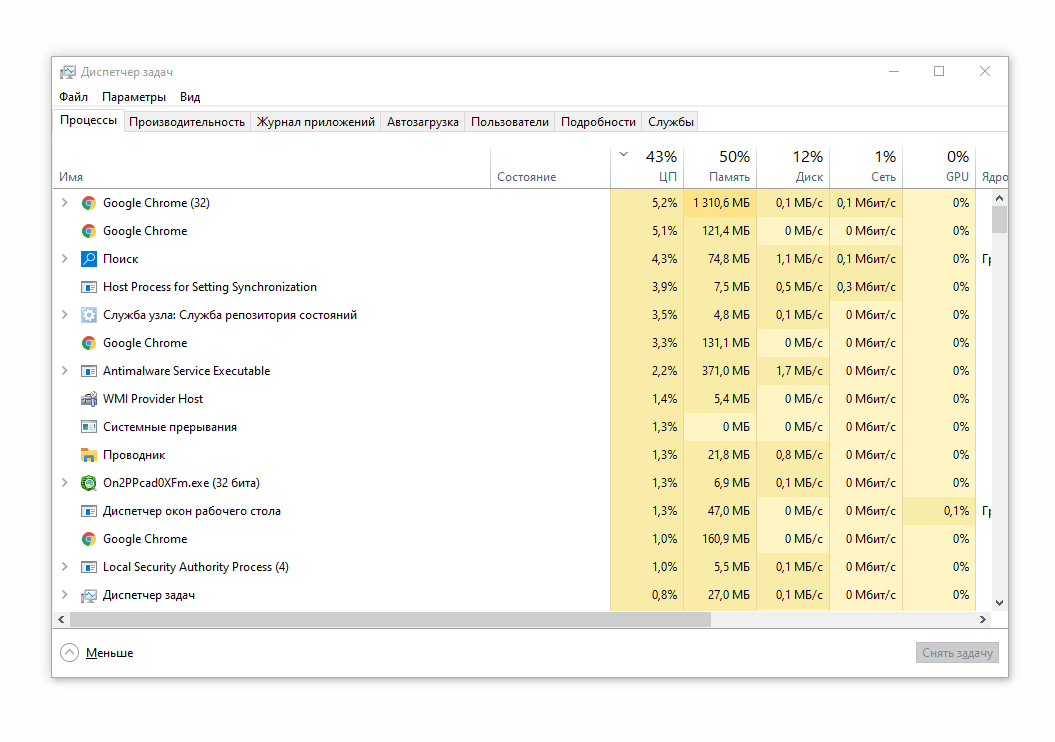
Here are the five most common reasons Windows 11 sits at 90–100% disk usage.
1. Not enough RAM, heavy paging. When RAM runs out, Windows offloads data to the pagefile (pagefile.sys). On a mechanical HDD this generates a flood of small random I/O and almost always pushes usage to 100%. The tell-tale sign is memory and disk usage climbing together while the system freezes for a few seconds at a time.
2. Outdated SATA/AHCI or NVMe drivers. A misbehaving storage controller driver is a classic cause, especially after a Windows 11 upgrade. Sometimes rolling back to the generic Microsoft driver helps; sometimes installing the vendor driver (Intel RST, AMD) does.
3. Malware. Cryptominers, rootkits and shady adware run in the background and constantly hit the disk. If you suspect one, run a full scan with Microsoft Defender Offline and a second opinion with tools such as Malwarebytes or Kaspersky Virus Removal Tool.
4. Windows background services. SysMain (the renamed SuperFetch), Windows Search indexing, Connected User Experiences and Telemetry (DiagTrack), and Windows Update downloading in the background all keep the disk busy. On slower systems, any one of them can pin it at 100%.
5. Several heavy apps running at once. Chrome with dozens of tabs, a video editor, a running virtual machine and an antivirus scan will happily saturate an HDD together. The fix here is closing things, not tweaking settings.
Update your storage drivers
Windows 11 usually installs a working storage driver on its own, but if the disk is misbehaving it is worth checking by hand.
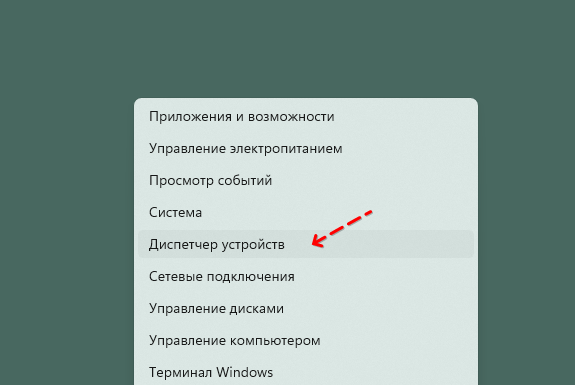
Step 1. Right-click the Start button and choose Device Manager.
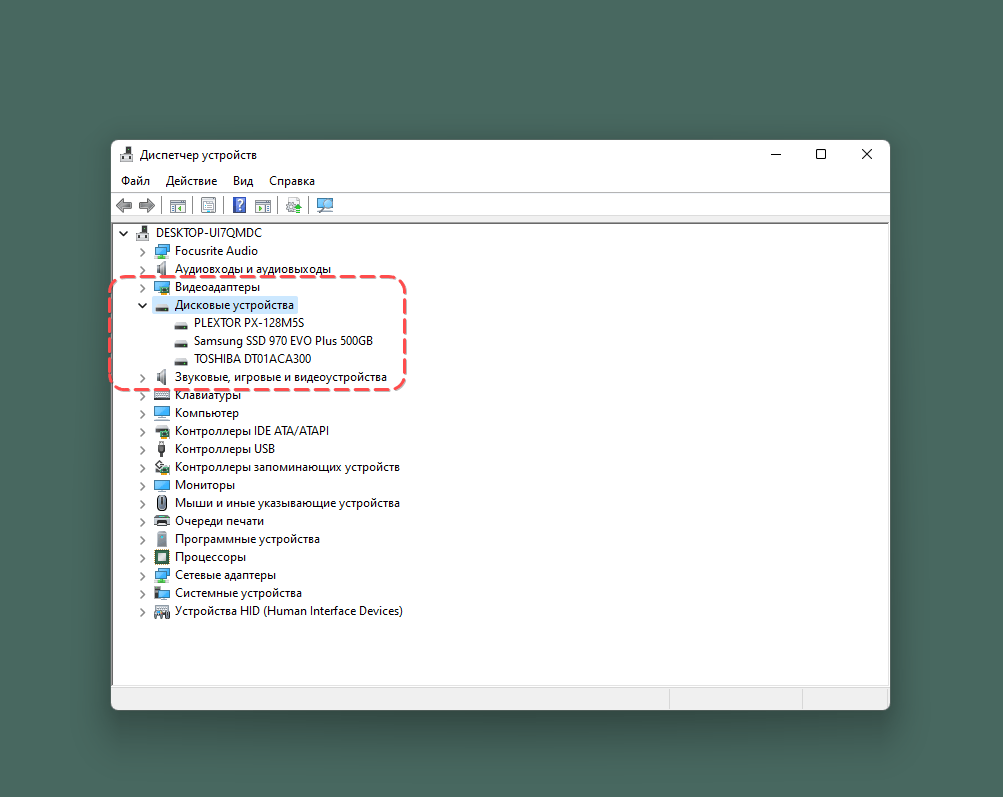
Step 2. Expand Disk drives — every attached storage device is listed here.
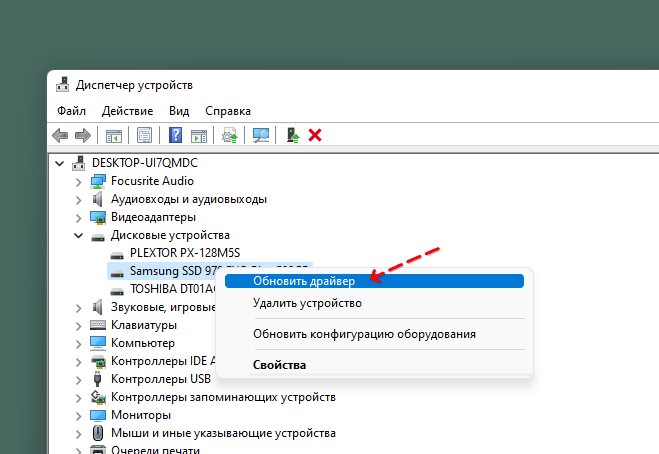
Step 3. Find the problem drive (the model name usually includes the manufacturer — Samsung, WD, Kingston and so on), right-click it and choose Update driver → Search automatically for drivers.
Step 4. Also expand IDE ATA/ATAPI controllers and do the same for the SATA AHCI controller. Its driver is the one that most often causes disk-usage weirdness.
Step 5. Reboot.
On Intel platforms, installing Intel Rapid Storage Technology from Intel's site sometimes resolves the problem in one shot.
Disable Windows Search
The Windows Search service indexes your files so that Start-menu and File Explorer searches return instantly. On some machines the indexer keeps re-reading the disk and holds it near 100% for long stretches. It's worth disabling only if you rarely use search.
- Press Win+R, type
services.mscand press Enter.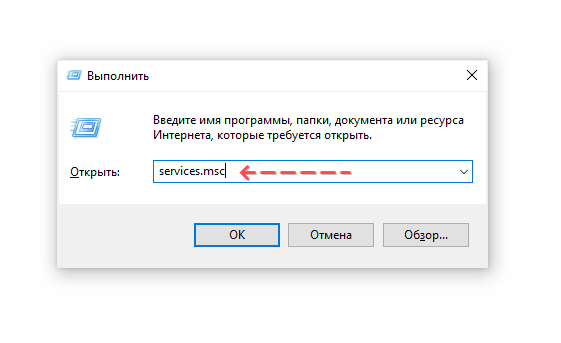
- Sort the list by name and find Windows Search.
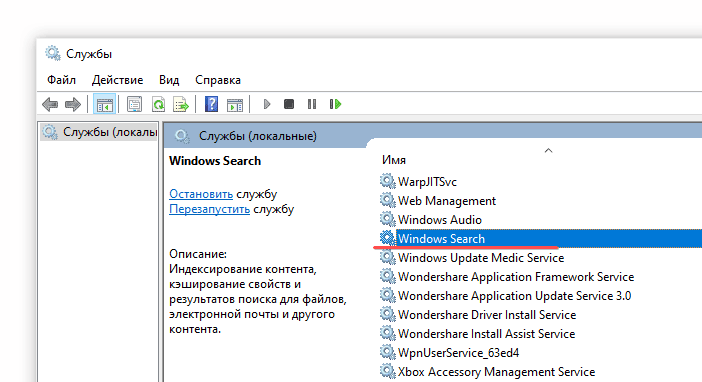
- Double-click it. Set Startup type to Disabled, click Stop, then OK.
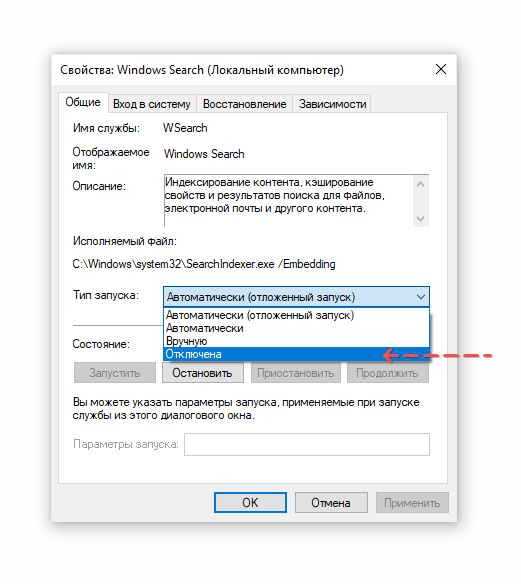
Search itself still works — it just scans without an index and feels noticeably slower.
Disable SysMain (formerly SuperFetch)
In Windows 10 and Windows 11 the SuperFetch service was renamed to SysMain. It tries to predict which apps you'll launch and pre-loads them into memory from disk. On systems with a slow HDD and modest RAM, SysMain itself often causes the 100% usage it's supposed to prevent. On SSDs, disabling it makes almost no difference — so this is one of the first steps to try when the disk keeps stalling.
Option 1. Through services.msc
- Open
services.msc(Win+R). - Find the SysMain service.
- Double-click → Startup type: Disabled → Stop → OK.
Option 2. Through the registry
- Press Win+R, type
regedit, confirm the UAC prompt.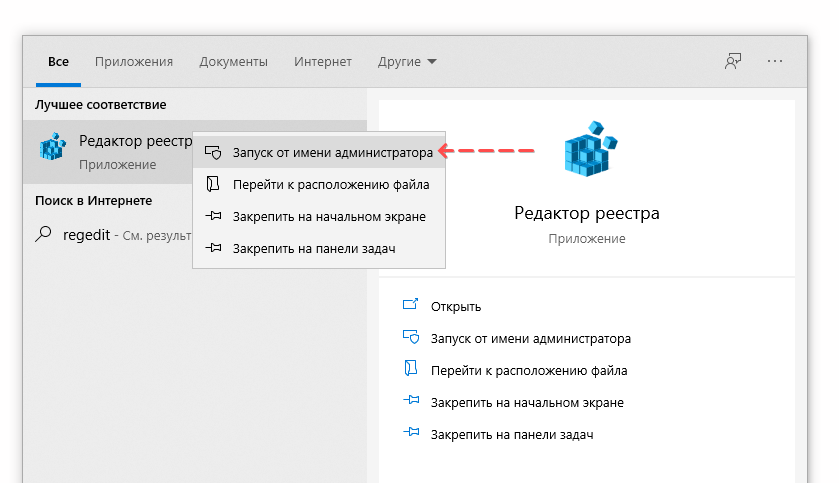
- Go to
HKEY_LOCAL_MACHINE\SYSTEM\CurrentControlSet\Control\Session Manager\Memory Management\PrefetchParameters. - Double-click the value named EnableSuperfetch (not EnablePrefetcher — that controls a different feature) and set it to
0. If it doesn't exist, create it as a DWORD (32-bit) value.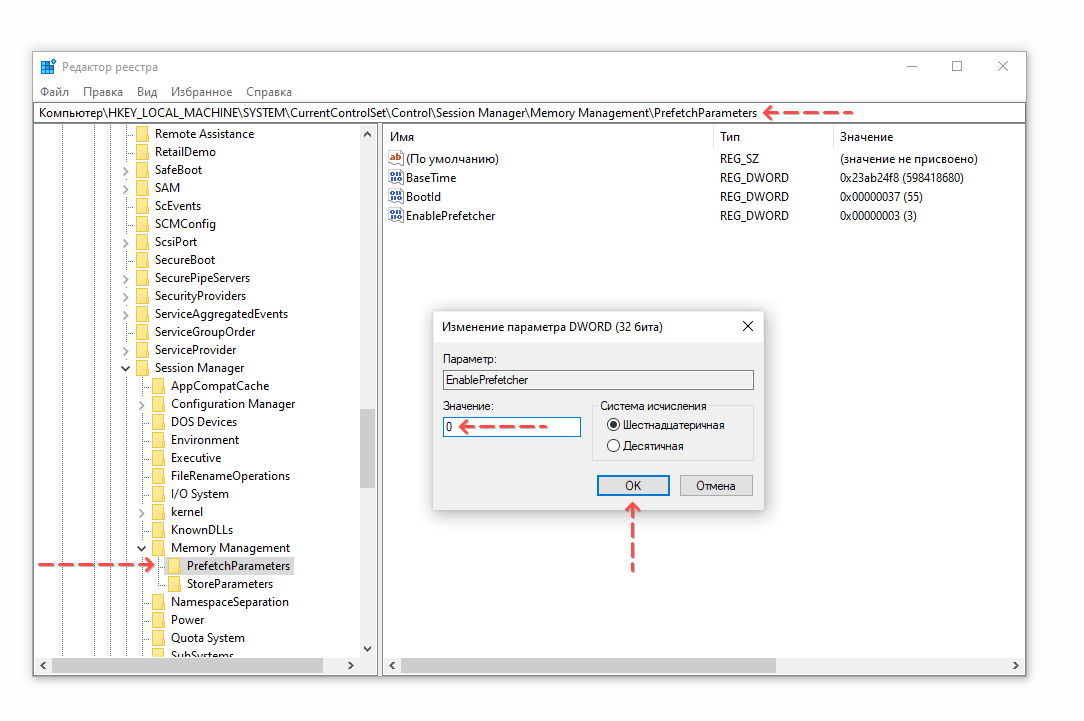
- Reboot.
To re-enable the service, set the value back to 3 or restore its startup type to Automatic in services.msc.
Turn off page preloading in Chrome
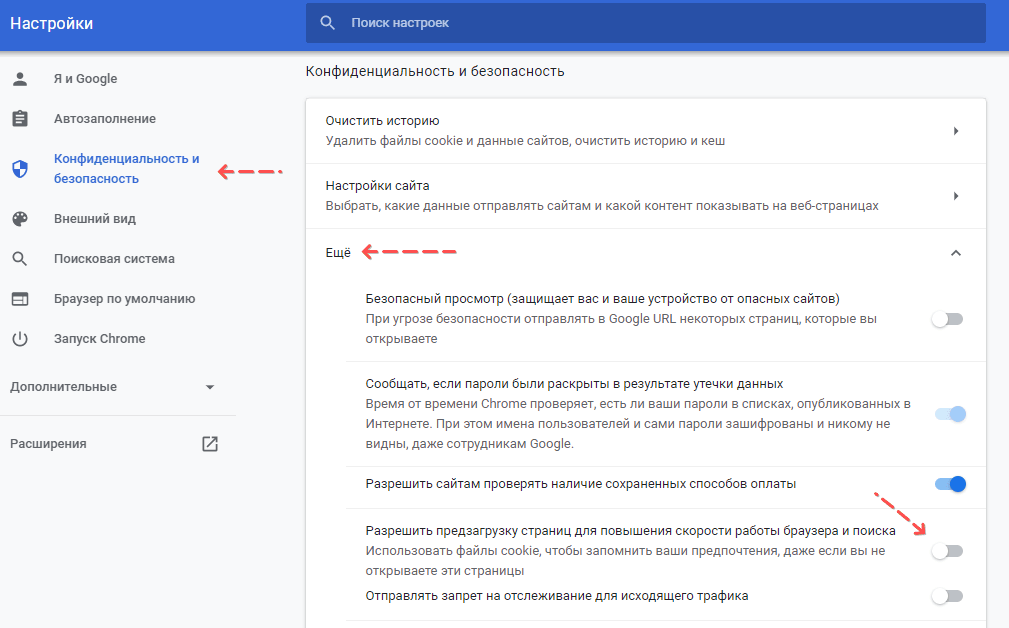
Chrome can pre-fetch pages it thinks you'll click next. On modest hardware this adds noticeable background disk and network activity. In current Chrome builds the setting lives under Performance.
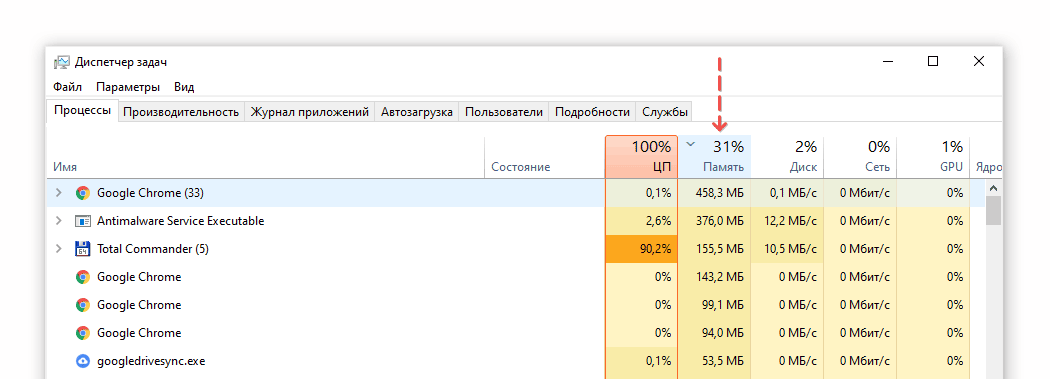
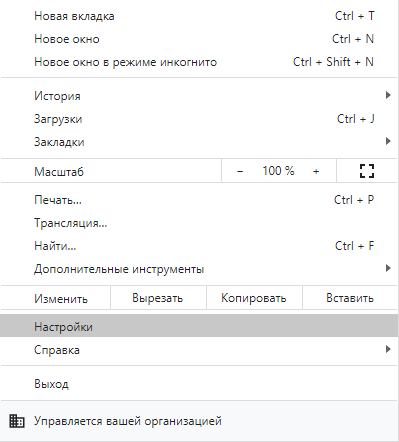
- Open Menu (⋮) → Settings.
- Go to Performance (in older builds: Privacy and security → Cookies and other site data).
- Under Preload pages, choose No preloading.
Add more RAM
Not a software trick, but on older machines this is the fix that actually solves the problem. Chrome, Microsoft Teams, modern IDEs and an antivirus will happily eat 8 GB between them; anything that doesn't fit spills into the pagefile on the HDD, which is exactly what pins the disk at 100%.
Sensible amounts for 2026:
- 8 GB — the bare minimum for Windows 11; don't expect a comfortable experience.
- 16 GB — the reasonable default for everyday and office use.
- 32 GB — for gaming, video editing, development and virtual machines.
Before buying, check your motherboard or laptop model: the supported memory type (DDR4/DDR5), maximum per-slot capacity and total slot count are all on the manufacturer's site.
Turn off telemetry (DiagTrack)
Windows telemetry is handled by the Connected User Experiences and Telemetry service (internal name DiagTrack). It periodically writes diagnostic packages to disk and sends them to Microsoft. You can't fully disable it through Settings — only reduce what it sends — so both steps are below.
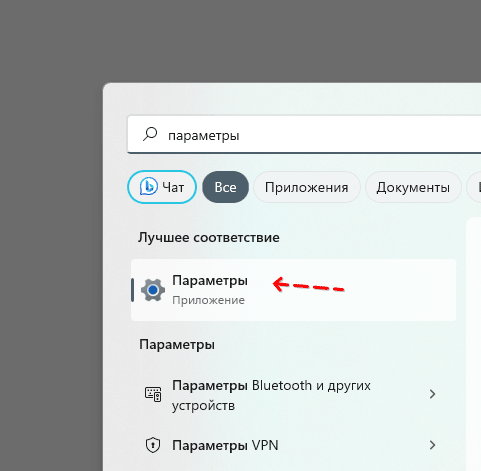
Step 1. Open Settings (Win+I) → Privacy & security.
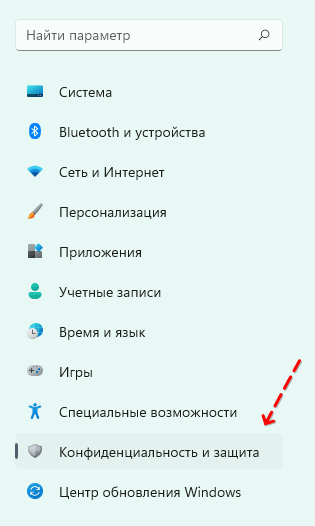
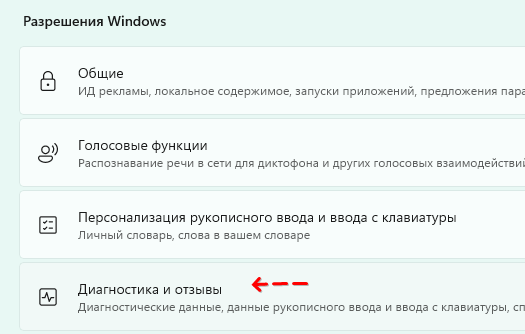
Step 2. Go to Diagnostics & feedback.
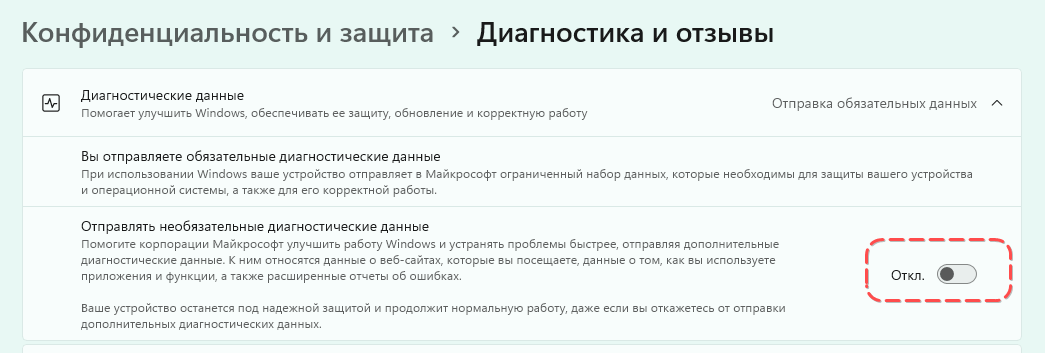
Step 3. Turn off Send optional diagnostic data.
Step 4. Under Feedback frequency pick Never.
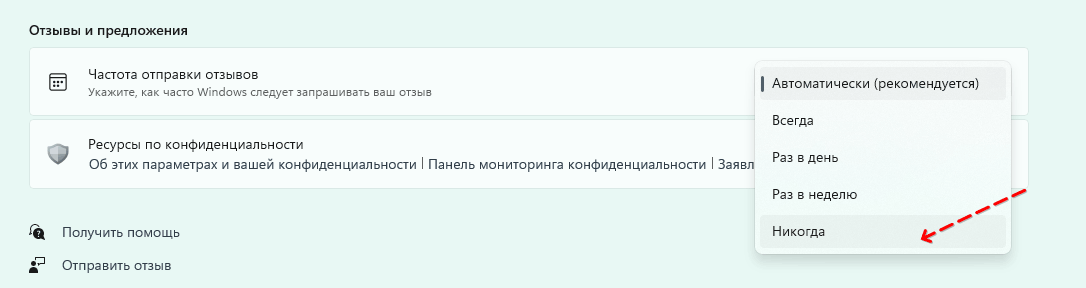
Step 5 (optional). Stop the service itself: services.msc → Connected User Experiences and Telemetry → set startup type to Disabled and click Stop.
Reconfigure the pagefile
If the pagefile is too small or badly fragmented, Windows will regularly freeze at 100% disk usage.
Step 1. Right-click Start → System.
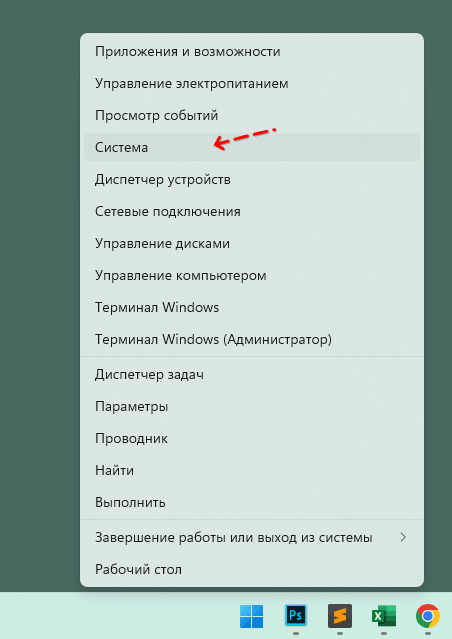
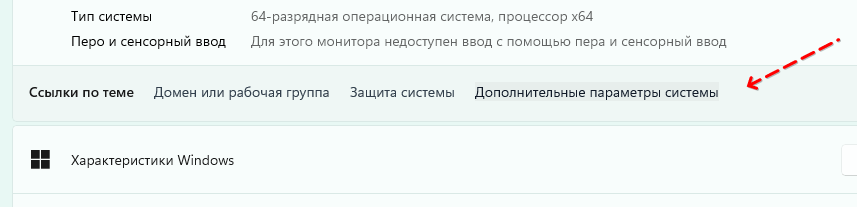
Step 2. Scroll down and open Advanced system settings.
Step 3. On the Advanced tab, in the Performance block, click Settings.
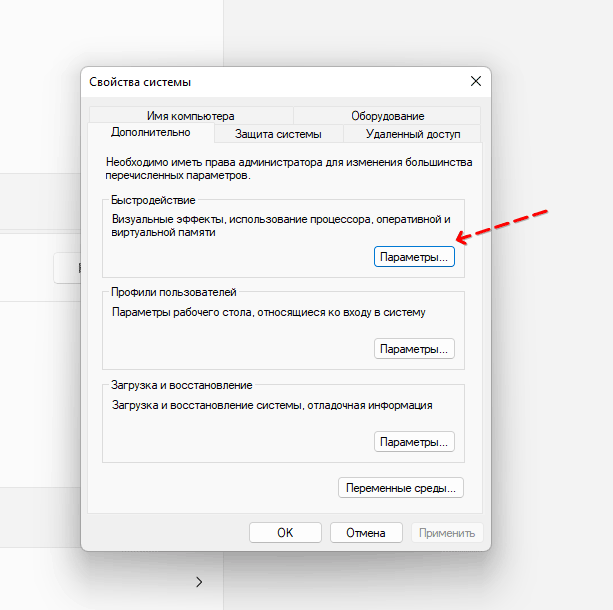
Step 4. In the new window, again the Advanced tab → Change… under Virtual memory.
Step 5. Uncheck Automatically manage paging file size for all drives and enter your own values.
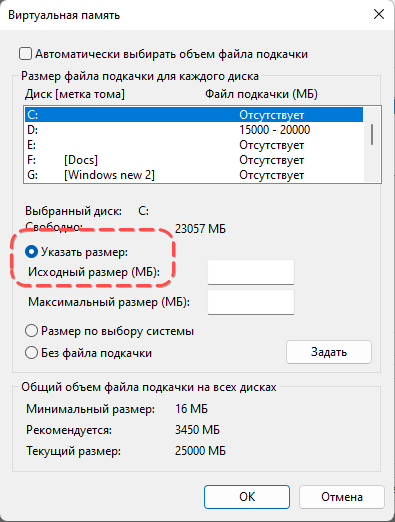
What size to use. A workable rule of thumb: set the initial size roughly equal to your RAM and the maximum size to 1.5–2× RAM. For an 8 GB system that's an initial size of 8192 MB and a maximum of 16384 MB. If you have a spare SSD, host the pagefile on the SSD rather than the slow HDD.
Reboot.
Enable the High performance power plan
By default Windows 11 uses the Balanced plan, which saves power at the cost of slightly throttled I/O. On a desktop that trade-off usually isn't worth it.
Note: in Windows 11 the settings section is called Power & battery (not Power & sleep, which was the Windows 10 name). The classic power plans are only reachable through the Control Panel.
- Press Win+R, type
powercfg.cpland press Enter. - If High performance is missing from the list, expand Show additional plans. If it's still missing, open PowerShell as administrator and run
powercfg -duplicatescheme 8c5e7fda-e8bf-4a96-9a85-a6e23a8c635c— this restores the hidden High performance plan. - Select it and click Change plan settings → Change advanced power settings.
- Under Processor power management → Minimum processor state set 100%.
- Under System cooling policy pick Active.
- Click Apply → OK.
The machine will run noticeably hotter — watch temperatures with tools like HWiNFO or Core Temp, and don't leave this plan on for a laptop running on battery.
Disable scheduled defrag on SSDs
Careful with this one: on HDDs, scheduled defrag is useful — leave it on. On SSDs, full defragmentation is harmful because it wears out the flash cells. Windows knows this and issues TRIM commands instead of a real defrag, but the scheduler itself can still spike disk usage.
- Search for "Defragment" and open Defragment and Optimize Drives.
- Check that each drive is correctly identified in the Media type column (Solid state drive or Hard disk drive).
- Click Change settings.
- For SSDs, either uncheck Run on a schedule, or click Choose and remove them from the list.
- Leave the schedule on for HDDs.
Still stuck at 100%? If usage stays high after all of the above, you're looking at either a stubborn malware infection or a physically dying HDD. Check the drive's S.M.A.R.T. status with CrystalDiskInfo: anything other than "Good" means it's time to plan a replacement. The most reliable long-term fix for disk-usage problems in 2026 is still the same one — swap the HDD for a SATA SSD or an NVMe drive.
Помощь
Не нашли ответ?
Опишите проблему — подскажем, куда двигаться дальше, и по возможности дополним материал.
Комментарии
Загружаем обсуждение…