Инструкция
How to Check and Repair Disk Errors in Windows with CHKDSK
Updated September 1, 2026
Contents:
- What the chkdsk utility does
- Checking a disk for errors with chkdsk (GUI)
- Running chkdsk from the command line
- Video walkthrough
- How to check the disk if Windows won't boot
- Other tools for repairing disk errors
- FAQ
What the chkdsk utility does
chkdsk (short for check disk) is the standard disk-checking tool built into Windows. If the file system contains errors, the chkdsk command can find and repair them for free, without any third-party software. According to Microsoft's official documentation, chkdsk checks the file system and file-system metadata of a volume for logical and physical errors, and — when run with the right parameters — fixes them.
Main functions of chkdsk:
- scanning and repairing file-system errors on NTFS, FAT32 and exFAT volumes;
- marking bad sectors (physically damaged areas of the disk) so Windows stops writing to them;
- checking other storage media — USB flash drives, SD cards, and external HDDs/SSDs — for errors.
The check disk utility has shipped with every version of Windows since MS-DOS, and it's still present in Windows 10 and Windows 11. According to the CHKDSK entry on Wikipedia, the command dates back to 1980 and is available in both Command Prompt and PowerShell, with a special version in the Recovery Console. It can also be launched from a Windows installation (bootable) disk or USB drive when the operating system refuses to start.
Below we walk through what CheckDisk can do, list the available chkdsk commands, and show every way to launch the utility in Windows.
How to check a disk for errors through CheckDisk (GUI)
- Open File Explorer (from the taskbar or the Start menu).
- Go to the main view and click This PC.
- Right-click the drive, memory card or flash drive you want to check.
- Choose Properties → Tools.
- Under Error checking, click the Check button. The scan requires administrator privileges (how to get administrator rights in Windows).
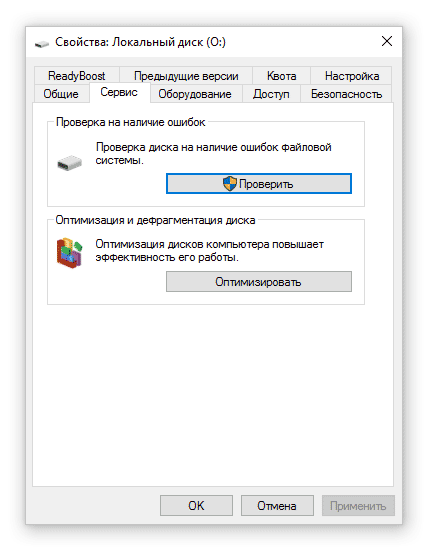
- If no errors are found on the selected partition — great, nothing to do.
- If errors are found, Windows will fix them automatically during the HDD scan.
Scan time depends heavily on drive size, fill level, interface speed and whether you enable the surface check. A quick file-system check (no /r) on a modern SSD is usually a matter of minutes. A full /r-pass on a large mechanical HDD is much slower and can take several hours — plan accordingly and don't start it right before you need the machine.
When the scan finishes, Windows shows the message "Your drive was successfully scanned". Click Show Details to open the Event Viewer entry and see exactly which errors, if any, were found and fixed.
If you pick the system partition (the one Windows is installed on, usually C:), chkdsk cannot lock it while Windows is running and will offer to schedule the scan for the next reboot. The automatic check then runs before Windows loads, with the parameters described below.
Using the command line to check the disk for errors
The console version of chkdsk is a system utility launched from the Windows command line. It's the classic way to test an HDD or SSD and check the disk for read errors. Functionally it's the same engine as the graphical version, but it exposes far more options.
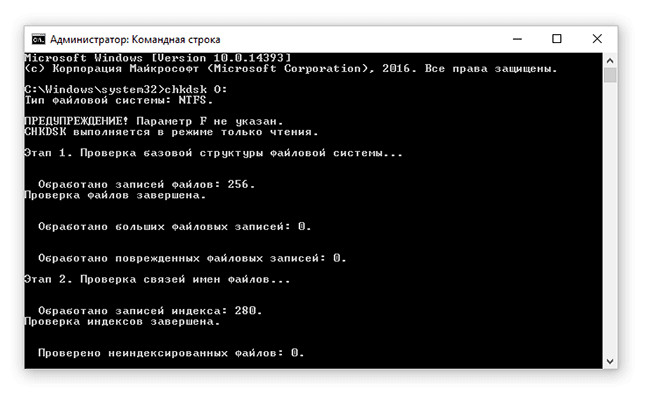
To launch the CHKDSK command and scan for file-system errors, do the following.
Windows 10 and Windows 11:
- Open the Power Users menu with Win + X.
- Choose Command Prompt (Admin), Windows PowerShell (Admin) or Terminal (Admin), depending on your Windows build. In Windows 11 22H2 and later this entry is labeled Terminal (Admin) and opens PowerShell by default — chkdsk works the same way there.
In earlier versions of Windows, the command prompt is available through Start → Run with the command cmd. Always launch it as administrator: Microsoft explicitly notes that membership in the local Administrators group is the minimum required to run chkdsk. Without admin rights the tool only runs in read-only mode and can't repair anything.
When you first start chkdsk with no arguments, it shows the status of the current drive. To actually scan a disk you need to pass parameters:
chkdsk [Drive:] [parameters]For example, to search for errors on drive D: and fix them, run:
chkdsk D: /f /r /xPress Y to confirm the operation. If you target the system drive C: instead, the volume can't be locked while Windows is running, so chkdsk will simply offer to schedule the scan for the next reboot — the /x switch has no effect in that scenario.
Most useful chkdsk command parameters:
/f— fix errors found on the disk./r— locate bad sectors and recover readable information (implies/f). This is the slow, full surface scan./x— force the volume to dismount first, invalidating any open handles (implies/f)./b— re-evaluate bad clusters on NTFS volumes (implies/r)./scan— online scan of an NTFS volume without taking it offline (Windows 8 and later)./spotfix— very fast targeted repair on NTFS volumes; requires the drive to be offline briefly./v— verbose output; on NTFS also shows cleanup messages./i— less thorough index check on NTFS. Speeds up the scan./c— skip the check of cycles inside the folder structure (NTFS only). Speeds up the scan./l:size— change the NTFS log-file size (in kilobytes).
That's not the full list. The complete parameter reference, including options for FAT/FAT32 volumes and less common switches, is available in the official Microsoft chkdsk documentation. You can also list every switch supported on your version of Windows with:
chkdsk /?Typical scenarios:
- Quick file-system check on drive D: —
chkdsk D: - Fix file-system errors on drive D: —
chkdsk D: /f - Full scan with bad-sector recovery —
chkdsk D: /f /r - Fast online scan of an NTFS volume without downtime —
chkdsk D: /scan - Check a USB flash drive marked as E: —
chkdsk E: /f
A note for SSD owners. The /r switch was designed for mechanical hard drives: it reads every sector of the surface to look for physical defects. That model doesn't map cleanly onto solid-state drives, where the controller uses wear-leveling and its own spare area to handle failing cells transparently. On an SSD, chkdsk /f (or /scan) is enough for file-system checks — leave media health monitoring to SMART tools like CrystalDiskInfo or the vendor utility. Repeated /r passes on an SSD add unnecessary read/write activity without any diagnostic upside.
Forcing a scan at the next reboot. If you want to guarantee that chkdsk runs on a volume the next time Windows starts, you can set the volume's dirty bit. According to Microsoft's fsutil dirty reference, when the dirty bit is set, autochk automatically checks the volume for errors on the next restart. From an elevated prompt:
fsutil dirty set C:After the next reboot, chkdsk will run against that volume before Windows fully loads.
Video: how to check a disk for errors
Checking a disk for errors from the Recovery Console (when Windows won't boot)
If Windows fails to start, you can still run a check-disk scan from the Windows Recovery Environment (WinRE), which gives you access to the chkdsk command. Here's how to reach it:
- Insert a Windows installation DVD or plug in a bootable Windows USB drive.
- In the BIOS/UEFI, set the corresponding boot device as first.
- When the Windows installer loads, pick your keyboard layout and language, then press Shift + F10 to open a command prompt directly.
- Alternatively, open the Recovery Console via Next → Repair your computer → Troubleshoot → Advanced options → Command Prompt.
- Run
chkdsk [X]: /f /r, where[X]is the letter of the drive you want to check (see instructions above).
Keep in mind that in the recovery environment drive letters often don't match what you see inside Windows — the boot partition may show up as C:, D: or something else entirely. If in doubt, run diskpart, then list volume to see how volumes are lettered, and exit back to the prompt before starting the chkdsk scan.
Other tools for repairing hard-drive errors
To be fair, chkdsk doesn't fix every possible problem. It's excellent at repairing file-system inconsistencies — a corrupt MFT, cross-linked files, orphaned records — but it can't do deep hardware-level analysis, and it can't rescue data from a drive that's already failing mechanically.
For serious diagnostics, use tools built for the job:
- CrystalDiskInfo — reads SMART attributes and gives an at-a-glance health verdict for HDDs and SSDs.
- Victoria and HDDScan — perform low-level surface tests and remap bad sectors on mechanical drives.
- Manufacturer utilities such as SeaTools (Seagate), Data Lifeguard Diagnostic (Western Digital), SanDisk Dashboard and Samsung Magician — usually the most accurate option for drives from those brands, since they know their own firmware.
If chkdsk hasn't solved your problem, read our overview of hard-drive diagnostic programs and try one of the alternatives.
FAQ
What is the difference between chkdsk /f and chkdsk /r?
/f tells chkdsk to fix logical errors it finds in the file system — corrupt directory entries, cross-linked files, invalid file records. /r does everything /f does and performs a full surface scan, looking for physically bad sectors and attempting to recover any readable data from them. /r is much slower. Use /f for routine checks; run /r only when you suspect the drive has hardware problems.
How long does chkdsk take?
Anywhere from a couple of minutes to many hours. A simple chkdsk /f on a healthy SSD usually finishes in minutes. A full chkdsk /r on a large mechanical HDD can run for several hours, especially if the drive is failing and chkdsk has to retry reads. If the scan seems suspiciously fast on a large HDD, that's not always a good sign — it may indicate that a lock condition or hardware problem prevented a real surface pass.
Is it safe to run chkdsk on an SSD?
Yes — chkdsk /f and chkdsk /scan are safe and useful on SSDs, because they only inspect and repair the file system. You should avoid running chkdsk /r routinely on SSDs: it forces a full surface read that isn't diagnostically meaningful on flash storage, and adds wear for no benefit.
Can I stop chkdsk while it's running?
You can, but it isn't recommended. Microsoft states that interrupting chkdsk isn't recommended, though cancelling it shouldn't leave the volume in a worse state than before. If you do have to interrupt it, just run chkdsk again afterwards to finish repairing any remaining corruption.
How do I force chkdsk to run at the next Windows boot?
Set the dirty bit on the target volume from an elevated command prompt: fsutil dirty set C:. On the next restart, autochk will see the flag and run chkdsk before Windows loads. You can also schedule it explicitly with chkntfs /c C:.
Why does chkdsk say the drive is locked or in use?
chkdsk needs exclusive access to the volume to repair it. On the system drive, or any drive with open files, it can't get that lock while Windows is running, so it schedules the scan for the next reboot instead. Use /x to force a dismount on non-system drives, or accept the reboot prompt for C:.
Помощь
Не нашли ответ?
Опишите проблему — подскажем, куда двигаться дальше, и по возможности дополним материал.
Комментарии
Загружаем обсуждение…