Инструкция
iPhone Location Services and Find My: Complete Guide (iOS 18)
Updated September 8, 2026
Your iPhone can pinpoint its location with impressive accuracy, help you find lost devices even when they're powered off, and share your whereabouts with people you trust — all with your explicit consent. This guide walks through how it all works in iOS 18, the technology behind it, and how to configure privacy so no one can track you without your knowledge.
On this page
- How iPhone figures out where you are
- Turning on Location Services
- Checking your current location
- Precise vs. approximate location
- Controlling app permissions
- The Find My app: locating your own iPhone
- Finding your iPhone from iCloud.com or Android
- Finding an iPhone that's powered off
- Sharing your location with someone else
- Significant Locations history
- Privacy: turning tracking off
- Frequently asked questions
How iPhone figures out where you are
Location accuracy on iPhone comes from several sources working together. According to Apple's official documentation, iOS relies on:
- GPS and GNSS receivers — 3–5 meter accuracy in the open, using GPS (US), GLONASS, Galileo, and BeiDou satellite constellations.
- Cellular towers — rough triangulation based on cell IDs, accurate to anywhere from 200 meters in dense cities to several kilometers in rural areas.
- Wi-Fi hotspots — Apple maintains a database of public Wi-Fi access points and can pinpoint your location to within 10–50 meters even without a GPS signal.
- Bluetooth beacons (iBeacon) — deployed indoors where GPS doesn't reach, like airports and shopping malls.
- Ultra Wideband (UWB) via the U1/U2 chip — available on iPhone 11 and later, excluding iPhone SE and models with an "e" suffix. UWB delivers centimeter-level accuracy when locating nearby AirTags, other iPhones, or accessories marked "Works with Apple Find My."
iOS automatically switches between these sources depending on which is available and most accurate — which is why Maps, ride-sharing apps, and food delivery apps almost always know where you are, even indoors where GPS is unreliable.
Turning on Location Services
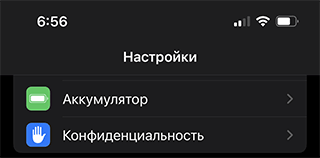
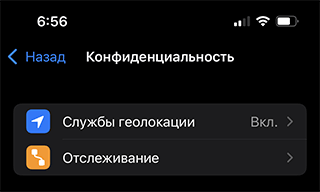
Before any location-aware feature can work — Maps, Weather, Find My, food delivery — Location Services needs to be enabled. The menu name changed in iOS 16: it's now called Privacy & Security, not just "Privacy" as it was through iOS 15.
- Open Settings.
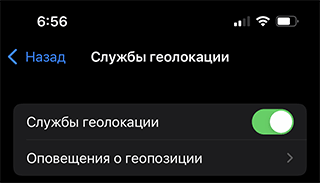
- Go to Privacy & Security → Location Services.
- Toggle the main Location Services switch on.
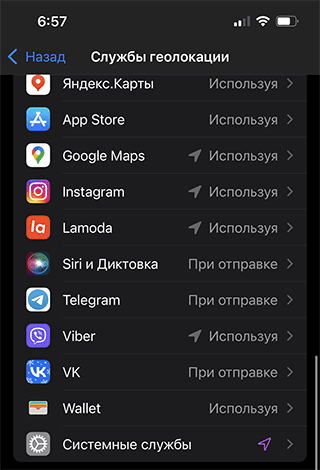
Below the main toggle you'll see a list of every app that has requested location access, each with its own permission setting. At the bottom of that list, System Services handles system-level features: time zone updates, Significant Locations, Find My iPhone, emergency calls, and so on.
Worth knowing: even with Location Services turned off entirely, iPhone still transmits your location during emergency calls to 911, 112, and equivalent numbers. Per Apple's policy, this can't be disabled — it's built in for your safety.

Checking your current location
The process is essentially the same in Apple Maps, Google Maps, or any third-party navigation app:
- Make sure Location Services is enabled.
- Open the map app and grant it location access when prompted.
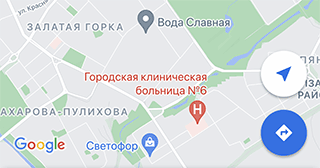
- Tap the current location icon — usually an arrow on the right side of the screen (Apple Maps) or a circular dot (Google Maps).
- The map centers on your current position.
- To see the exact address, press and hold the point on the map. A card appears with coordinates and the nearest street address.
Precise vs. approximate location
With iOS 14 in 2020, Apple added the option to grant apps only an approximate location. This means you can use, say, a weather or news app without handing over your exact coordinates — the app receives only a broad neighborhood area (roughly 10 square kilometers).
How to configure this per app:
- Settings → Privacy & Security → Location Services.
- Find the app in the list.
- Scroll to the Precise Location toggle at the bottom.
- Turn it off for any app that doesn't genuinely need pinpoint coordinates.
Rule of thumb: precise location is genuinely useful for maps, navigation, rideshares, food delivery, and fitness trackers. For pretty much everything else — news, social media, weather, retail apps — approximate location works just as well and gives away far less about you.

Controlling app permissions
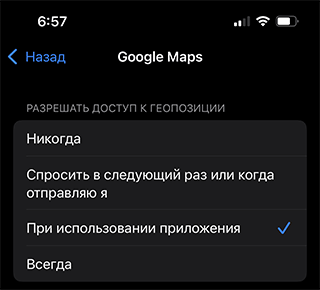
Every app gets its own permission level. Under Settings → Privacy & Security → Location Services → [app], you'll see these options:
- Never. The app never gets your location.
- Ask Next Time or When I Share. The app asks again the next time it launches.
- While Using the App. Location access only when the app is actively open on screen. This is the right choice for most apps.
- Always. Background location access — needed for navigation apps mid-route, fitness trackers, and smart home apps. Uses more battery.
iOS periodically reminds you when an app has used your location in the background, showing a map with the points it accessed. It's a good way to catch apps that are being greedier than they need to be.
The Find My app: locating your own iPhone
In 2019 Apple merged two previously separate apps — Find iPhone (for locating devices) and Find Friends (for sharing location with people) — into a single app called Find My. It comes preinstalled on iPhone, iPad, and Mac, and lets you:
- See your Apple devices on a map;
- Make them play a sound to help you locate them nearby;
- Remotely lock them (Lost Mode);
- Erase them if there's a real risk of theft;
- Share your location with family and friends (with mutual consent);
- Track AirTags and third-party accessories labeled "Works with Apple Find My."
Setting up Find My on iPhone
- Settings → tap your name at the top → Find My.
- Make sure Find My iPhone is turned on.
- Enable Find My network — this is what lets you locate the phone even when it's offline (see the section below).
- Enable Send Last Location — the phone will transmit its position one final time when the battery is critically low.
Finding your iPhone from iCloud.com or Android
If your iPhone is lost, you can locate it from any device with a browser — including an Android phone, a public computer, or a friend's tablet.
- Open icloud.com/find in any browser.
- Sign in with your Apple ID. Two-factor authentication will most likely kick in — the verification code will be sent to another Apple device you own or to your trusted phone number.
- In the Find Devices web app, select the iPhone you're looking for from the device list.
- The map shows its last known location. Available actions:
- Play Sound — the phone plays a loud alert, even if it's on silent.
- Mark As Lost (Lost Mode) — locks the device with your passcode, suspends Apple Pay, and can display a message with your contact number on the lock screen.
- Erase iPhone — wipes all data. Use only as a last resort: once erased, the device disappears from Find My entirely.
If you have another Apple device handy — a friend's iPhone, an iPad, or a Mac — the Find My app gives you the same capabilities in a tap or two, no browser needed.
Finding an iPhone that's powered off
This is one of the most underappreciated features of modern iPhones. Starting with the iPhone 11 and iOS 15, your phone can broadcast its location even when it's powered off or completely dead. Here's what's happening under the hood:
- iPhone has an Always-On Processor (AOP) — a co-processor that keeps running after the main system shuts down.
- The AOP uses reserve battery power to periodically emit an encrypted Bluetooth signal.
- Any nearby iPhone — not just yours, any iPhone participating in the Find My network — picks up that signal and anonymously forwards it to iCloud.
- You see the last transmitted location in the Find My app.
How long an iPhone stays findable after shutdown:
- After manual power-off with charge remaining — up to 24 hours.
- After the battery drains to 0% — the phone enters Power Reserve mode (introduced in iOS 15.2), broadcasting a low-power Bluetooth signal for approximately 5 more hours. Apple Wallet keys, transit cards, and digital car keys also remain functional during this window.
- Via the Find My network — the last known location remains available in iCloud for up to 7 days after the phone stops reporting entirely.
Hardware requirements: the powered-off tracking feature works only on iPhone 11 and later — models equipped with the UWB U1/U2 chip and a compatible Bluetooth module. All iPhone SE generations and any iPhone with an "e" suffix (like iPhone 16e) don't support this feature because they lack the UWB chip.
The full description of how the Find My network handles offline devices is in Apple's official support article.
Sharing your location with someone else
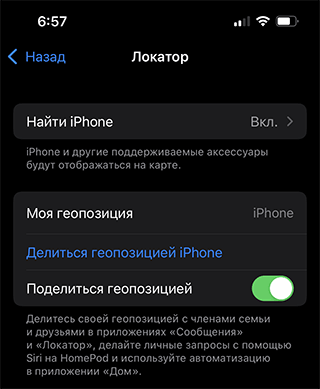
Location sharing on iOS is always two-way, voluntary, and explicitly confirmed. You can't be tracked without your knowledge. If someone doesn't accept a location request, they simply won't appear on your map.
How to share your location
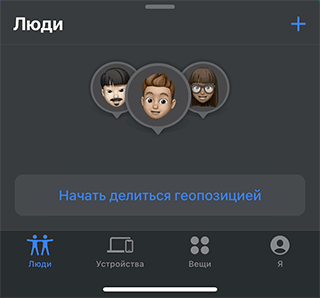
- Open the Find My app.
- Switch to the People tab.
- Tap Start Sharing Location.
- Select a contact from your address book.
- Choose how long to share: Share for One Hour, Share Until End of Day, or Share Indefinitely.
- Tap Send. The recipient gets an invitation they can accept or decline.
How to request someone else's location
After you've shared your own location, an Ask To Follow Location option appears in that contact's card — this sends them a request for mutual sharing. They can accept or decline; if they accept, their location shows up on your map.
How to stop sharing
At any time, go to Find My → People → [contact] → Stop Sharing My Location. The contact receives a notification that you're no longer sharing.
A word about privacy: any form of covert tracking through someone else's iPhone — installing spyware, using someone else's Apple ID without permission, hiding an AirTag on their belongings — is illegal in most jurisdictions and treated as a criminal offense. Since 2019, Apple has actively pushed back against stalkerware: if your iPhone detects an "unknown" AirTag or Find My network device that's been moving with you, it displays an "AirTag Found Moving With You" alert. See Apple's personal safety guide for more.

Significant Locations history
iOS keeps a local history of the places you visit most often — these are called Significant Locations. Based on this data, iPhone suggests routes in Maps, predicts commute times to home and work, and personalizes notifications.
Important detail: this data stays on your device, is end-to-end encrypted, and is not shared with Apple. Even Apple itself cannot access it.
Viewing or clearing your history
- Settings → Privacy & Security → Location Services.
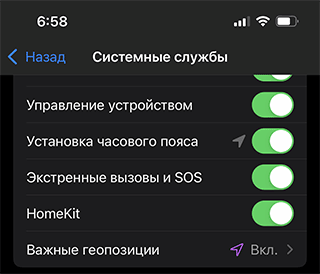
- Scroll to System Services at the bottom.
- Tap Significant Locations. Face ID or Touch ID authentication is required.
- At the bottom of the list you'll find a Clear History button. In the same screen you can turn off the Significant Locations toggle to stop future tracking.
Privacy: turning tracking off
Fully disabling all tracking features takes several steps, because location on iOS is layered:
- Disable Location Services entirely: Settings → Privacy & Security → Location Services → turn off the main toggle. This is the nuclear option: Maps, Weather, food delivery, and Find My all stop working.
- Disable per-app access: in the same menu, select the app and set it to Never.
- Turn off Precise Location for apps that don't need it: use the separate Precise Location toggle inside each app's settings.
- Stop the Significant Locations log: System Services → Significant Locations → turn off.
- Block advertiser tracking: Settings → Privacy & Security → Tracking → turn off "Allow Apps to Request to Track." This is App Tracking Transparency, a separate feature introduced in iOS 14.5.
- Audit who you're sharing with: Find My → People shows every contact you've granted location access to.
For fully anonymous device use, you'd also need to sign out of iCloud and avoid cellular service — usually impractical for a daily-driver smartphone. A detailed walkthrough of iOS 18 privacy settings is available in this Help Net Security guide.
Frequently asked questions
Can you track an iPhone that's turned off?
Yes, if it's an iPhone 11 or newer (excluding iPhone SE and "e" models), with Find My network and Send Last Location enabled. After a manual shutdown, the phone stays visible on the Find My network for up to 24 hours; if fully drained, another 5 hours or so in Power Reserve mode. The last known location remains in iCloud for up to 7 days.
Can you find an iPhone using an Android phone?
Yes — open icloud.com/find in any browser, sign in with your Apple ID, and select the device. The mobile-browser interface is stripped down but all essential actions — Play Sound, Lock, Erase — are available.
What is the U1 chip and why does it matter?
U1 is Apple's proprietary Ultra Wideband chip, installed in iPhone 11 and every subsequent model except iPhone SE. It provides precise direction and distance measurements to other U1-equipped devices (AirTag, other iPhones, Find My accessories), accurate to within centimeters. U1 is what powers AirTag's Precision Finding feature and the way AirDrop prioritizes the recipient when you point your iPhone at another device.
Does Apple track my movements?
Significant Locations history is stored only on your iPhone, encrypted, and never transmitted to Apple. Location data Apple uses to improve Maps and Wi-Fi positioning is sent anonymously with no link to your Apple ID — this is spelled out in Apple's Location Services privacy policy. Individual apps can, of course, collect your location — but only with permissions you've explicitly granted.
How can I tell if someone is tracking me?
iOS automatically alerts you when an "unknown" AirTag or Find My network device has been traveling with you for an extended period. Settings → Privacy & Security → Location Services also shows every app with location access and when each one last used it. Whenever any app requests your location, the arrow icon appears in the status bar at the top of the screen.
What should I do if my iPhone is stolen?
Immediately open icloud.com/find or the Find My app on another device and enable Lost Mode. This locks the phone with your passcode and suspends Apple Pay. If you don't believe you'll get it back, use Erase iPhone — this wipes the data, but Activation Lock via iCloud prevents anyone else from reactivating the device. Then report the theft to law enforcement with the device's serial number and IMEI, which you can find on your iCloud account page under Devices.
Помощь
Не нашли ответ?
Опишите проблему — подскажем, куда двигаться дальше, и по возможности дополним материал.
Комментарии
Загружаем обсуждение…